Featured
Showing posts with label Computer. Show all posts

Turn Your Windows PC Into a Wireless Hotspot

          Turn Your Windows PC Into a Wireless Hotspot


Before we begin, you should make sure that you've got a laptop or desktop with a wireless card that isn't currently connected—if your laptop is connected to the wired network, your wireless card should be free, and we can use it to allow access to the internet. Note that you have to be plugged into a wired connection in order to share the connection wirelessly with others, or have a second wireless card. Readers should also note that this won't work on (some) work networks that use group policies to enforce TPS report cover sheet boredom and prevent you from having any fun at all.
You'll want to start out by heading into the Network and Sharing Center through the Control Panel, or you can quickly get to it by right-clicking on the network icon in the system tray. Once you are there, find the link for "Set up a new connection or network".
You'll be prompted with a wizard that allows you to connect to VPNs, dial-up, or create a new ad hoc wireless network, which is what we want to do. You can easily use an ad hoc network to share files back and forth between two computers, but today we'll be using it for sharing the internet connection.
Turn Your Windows PC Into a Wireless Hotspot


You'll need to give your network a name and choose some security options—remember that WEP is extremely easy to crack—and you'll want to make sure to use at least a decent sized key even for WPA2. The really important option on this page is to remember to check the box for "Save this network".
Turn Your Windows PC Into a Wireless Hotspot
At this point your ad hoc network should be running and ready to start connecting your devices, but you'll want to hold off just a minute.

Turn Your Windows PC Into a Wireless Hotspot
You'll notice that the ad hoc networks that you create get added to the quick-select wireless network list—when you disconnect from your ad hoc network, it's the same as stopping it. Connecting to the network is the same as starting it back up; this way you can quickly switch back and forth between connections with just a few clicks.
Turn Your Windows PC Into a Wireless Hotspot
The last step is enabling connection sharing through your regular network card, which will allow anybody connected to your ad hoc wireless to use your internet connection. To do so, you'll want to head into the Network and Sharing Center, click the "Change adapter settings" link on the left, and then find your network connection in the list—it's very important that you only enable internet connection sharing on the adapter that is actually connected to the internet. In this case, my internet access at work goes through my Local Area Connection, so I've enabled it there.
At this point, you should be able to connect any wireless device to your new ad hoc network and access the internet, or even share files directly with your laptop.

Easy way to remove "Autorun.inf "

Remove "Autorun.inf " ...
.
Autorun.inf can be the big virus.You can’t delete
it.When you insert pen drive and contains the file
autorun.inf. then it will automatically run it
self.may be you have not observe any danger in
that.but sometime this file contains some harmful
code.It can be very ... dangerous for your
system.Normally there is no software to delete
this file from your computer.But now you can
delete it using command prompt.
.
Simply follow this trick...
.
Step 1:- Run command prompt as administrator.
Step 2:- Go to root directory using cd or cd/
command.
Step 3:- Now type “attrib -h -r -s autorun.inf” and
press enter.
It will search for autorun.inf file inyour computer.
Step 4:- Now you will have results if there is file
or not
if you find result of this file then type del
autorun.inf & press
Enter. This will delete autorun.inf from your
computer.
Step 5:- finally..Restart your Computer

DIFFERENCE BETWEEN CORE I3, CORE I5, CORE I7...??

DIFFERENCE BETWEEN CORE I3, CORE I5, CORE I7...??

-> Core i3:
* Entry level processor.
* 2-4 Cores
* 4 Threads
* Hyper-Threading ­ (efficient use of processor resources)
* 3-4 MB Cache
* 32 nm Silicon (less heat and energy)

-> Core i5:
* Mid range processor.
* 2-4 Cores
* 4 Threads
* Turbo Mode (turn off core if not used)
* Hyper-Threading ­ (efficient use of processor resources)
* 3-8 MB Cache
* 32-45 nm Silicon (less heat and energy)

-> Core i7:
* High end processor.
* 4 Cores
* 8 Threads
* Turbo Mode (turn off core if not used)
* Hyper-Threading ­ (efficient use of processor resources)
* 4-8 MB Cache
* 32-45 nm Silicon (less heat and energy)

Computer Fundamentals(Computer - Internet & Intranet)

Computer - Internet & Intranet

Internet

  • Internet is a world-wide / global system of interconnected computer networks.
  • Internet uses the standard Internet Protocol (TCP/IP)
  • Every computer in internet is identified by a unique IP address.
  • IP Address is a unique set of numbers (such as 110.22.33.114) which identifies a computer location.
  • A special computer DNS (Domain Name Server) is used to give name to the IP Address so that user can locate a computer by a name.
  • For Example, a DNS server will resolve a name http://www.tutorialspoint.com to a particular IP address to unique identify the computer on which this website is hosted.
  • Internet is accessible to every user all over the world.
Internet

Intranet

  • Intranet is system in which multiple PCs are networked to be connected to each other.
  • PCs in intranet are not availble to the world outside of the intranet.
  • Usually each company or organizations have their own Intranet network and members/employees of that company can access the computers in their intranet.
  • Each computer in Intranet is also identified by a IP Address which is unique among the computers in that Intranet.
Intranet

Similarities in Internet & Intranet

  • Intranet uses the internet protocols such as TCP/IP and FTP.
  • Intranet sites are accessible via web browser in similar way as websites in internet. But only memebers of Intranet network can access intranet hosted sites.
  • In Intranet, own instant messengers can be used as similar to yahoo messenger/ gtalk over the internet.

Differences in Internet & Intranet

  • Internet is general to PCs all over the world where Intranet is specific to few PCs.
  • Internet is wider access and provides a better access to websites to large populcation where as Intranet is restricted.
  • Internet is not as safe as Intranet as Intranet can be safely privatized as per the need.


Computer Fundamentals(Computer - Networking)

Computer - Networking

What is a Computer Network?

A computer network is a system in which multiple computers are connected to each other to share information and resources.
Computer Networks

Characteristics

  • Share Resources from one computer to another
  • Create files and store them in one computer, access those files from the other computer(s) connected over the network
  • Connect a printer , scanner, or a fax machine to one computer within the network and let other computers of the network use the machines available over network.
Following is the list of hardwares required to setup a computer network.
  • Network Cables
  • Distributors
  • Router
  • Internal Network Cards
  • External Network Cards

Network Cables

  • Network cable are used to connect computers. The most commonly used cable are Category 5 cable RJ-45.
Network Cables

Distributors

  • Each and every computer can be connected to another one via a serial port but if we need to connect many computers to produce a network, this serial connection will not work. The solution is to use a central body to which other computers, printers, scanners etc. can be connected and, and then this body will manage or distribute network traffic.
Network Distributor

Router

  • Arouter is a type of device which acts as the central point among computers and other devices that are part of a network.
  • A router is equipped with holes called ports.
  • computers and other devices are connected to a router using network cables.
  • Now-a-days router comes in wireless modes using which computers can be connected without any physical cable.
Network Router

Network Card

  • Network card is a necessary component of a computer without which a computer cannot be connected over a network.
  • Also known as network adapter or Network Interface Card (NIC).
  • Most of branded computers have network card pre-installed.
  • Network cards are of two types: Internal and External Network Cards

Internal Network Cards

  • Motherboard has a slot for internal network card where it is to be inserted.
  • Internal network cards are of two types.
  • First type uses Peripheral Component Interconnect (PCI) connection.
  • Second type uses Industry Standard Architecture (ISA).
  • Network cables are required to provide network access
Network Card

External Network Cards

  • Comes in two flavour: Wireless and USB based.
  • Wireless network card need to inserted into the motherboard but no network cable is required to connect to network.
Externl Network Card
  • USB card, are easy to use and connect via USB port.
  • Computer automatically detects USB card and can install the drivers required to support the USB network card automatically.
Data Card


Computer Fundamentals(Computer - Number Conversion)

Computer - Number Conversion

There are many methods or techniques which can be used to convert numbers from one base to another. We'll demonstrate here the following
  • Decimal to Other Base System
  • Other Base System to Decimal
  • Other Base System to Non-Decimal
  • Shortcut method - Binary to Octal
  • Shortcut method - Octal to Binary
  • Shortcut method - Binary to Hexadecimal
  • Shortcut method - Hexadecimal to Binary

Decimal to Other Base System

Steps
  • Step 1 - Divide the decimal number to be converted by the value of the new base.
  • Step 2 - Get the remainder from Step 1 as the rightmost digit (least significant digit) of new base number.
  • Step 3 - Divide the quotient of the previous divide by the new base.
  • Step 4 - Record the remainder from Step 3 as the next digit (to the left) of the new base number.
Repeat Steps 3 and 4, getting remainders from right to left, until the quotient becomes zero in Step 3.
The last remainder thus obtained will be the most significant digit (MSD) of the new base number.

Example

Decimal Number: 2910
Calculating Binary Equivalent:
StepOperationResult Remainder
Step 129 / 2141
Step 214 / 270
Step 37 / 231
Step 43 / 211
Step 51 / 201
As mentioned in Steps 2 and 4, the remainders have to be arranged in the reverse order so that the first remainder becomes the least significant digit (LSD) and the last remainder becomes the most significant digit (MSD).
Decimal Number: 2910 = Binary Number: 111012.

Other base system to Decimal System

Steps
  • Step 1 - Determine the column (positional) value of each digit (this depends on the position of the digit and the base of the number system).
  • Step 2 - Multiply the obtained column values (in Step 1) by the digits in the corresponding columns.
  • Step 3 - Sum the products calculated in Step 2. The total is the equivalent value in decimal.

Example

Binary Number: 111012
Calculating Decimal Equivalent:
StepBinary NumberDecimal Number
Step 1111012((1 x 24) + (1 x 23) + (1 x 22) + (0 x 21) + (1 x 20))10
Step 2111012(16 + 8 + 4 + 0 + 1)10
Step 31110122910
Binary Number: 111012 = Decimal Number: 2910

Other Base System to Non-Decimal System

Steps
  • Step 1 - Convert the original number to a decimal number (base 10).
  • Step 2 - Convert the decimal number so obtained to the new base number.

Example

Octal Number: 258
Calculating Binary Equivalent:

Step 1: Convert to Decimal

StepOctal NumberDecimal Number
Step 1278((2 x 81) + (5 x 80))10
Step 2278(16 + 5 )10
Step 32782110
Octal Number: 258 = Decimal Number: 2110

Step 2: Convert Decimal to Binary

StepOperationResult Remainder
Step 121 / 2101
Step 210 / 250
Step 35 / 221
Step 42 / 210
Step 51 / 201
Decimal Number: 2110 = Binary Number: 101012
Octal Number: 258 = Binary Number: 101012

Shortcut method - Binary to Octal

Steps
  • Step 1 - Divide the binary digits into groups of three (starting from the right).
  • Step 2 - Convert each group of three binary digits to one octal digit.

Example

Binary Number: 101012
Calculating Octal Equivalent:
StepBinary NumberOctal Number
Step 1101012010 101
Step 210101228 58 38
Step 3101012258
Binary Number: 101012 = Octal Number: 258

Shortcut method - Octal to Binary

Steps
  • Step 1 - Convert each octal digit to a 3 digit binary number (the octal digits may be treated as decimal for this conversion).
  • Step 2 - Combine all the resulting binary groups (of 3 digits each) into a single binary number.

Example

Octal Number: 258
Calculating Binary Equivalent:
StepOctal NumberBinary Number
Step 1258210 510
Step 22580102 1012
Step 32580101012
Octal Number: 258 = Binary Number: 101012

Shortcut method - Binary to Hexadecimal

Steps
  • Step 1 - Divide the binary digits into groups of four (starting from the right).
  • Step 2 - Convert each group of four binary digits to one hexadecimal symbol.

Example

Binary Number: 101012
Calculating hexadecimal Equivalent:
StepBinary NumberHexadecimal Number
Step 11010120001 0101
Step 2101012110 510
Step 31010121510
Step 5101012F16
Binary Number: 101012 = Hexadecimal Number: F16

Shortcut method - Hexadecimal to Binary

Steps
  • Step 1 - Convert each hexadecimal digit to a 4 digit binary number (the hexadecimal digits may be treated as decimal for this conversion).
  • Step 2 - Combine all the resulting binary groups (of 4 digits each) into a single binary number.

Example

Hexadecimal Number: F16
Calculating Binary Equivalent:
StepHexadecimal NumberBinary Number
Step 1F161510
Step 2F16110 510
Step 3F1600012 01012
Step 4F16000101012
Hexadecimal Number: F16 = Binary Number: 101012


Computer Fundamentals(Computer - Data & information)

Computer - Data & information

What is Data?

Data can be defined as a representation of facts, concepts or instruction in a formalized manner which should be suitable for communication , interpretation or processing by human or electronic machine.
Data is represented with the help of characters like alphabets (A-Z,a-z), digits (0-9) or special characters(+,-,/,*,<,>,= etc).
Computer Data

What is Information?

Information is organised or classified data so that it has some meaningful values to the receiver.
Information is the processed data on which decisions and actions are based.
For the decision to be meaningful, the processed data must qualify for the following characteristics
  • Timely - Information should be available when required.
  • Accuracy - Information should be accurate.
  • Completeness - Information should be complete.
Computer Information

Data Processing Cycle

Data processing is the re-structuring or re-ordering of data by people or machine to increase their usefulness & add values for particular purpose.
Data processing consists of basic steps input, processing and output. These three steps constitute the data processing cycle.
Data Processing Cycle
  • Input - In this step the input data are prepared in some convenient form for processing. The form will depend on the processing machine. For example, when electronic computers are used, the input data could be recorded on any one of several types of input medium, such as magnetic disks, tapes and so on.
  • Processing - In this step input data are changed to produce data in a more useful form. For example, pay-checks may be calculated from the time cards, or a summary of sales for the month may be calculated from the sales orders.
  • Output -Here the result of the proceeding processing step are collected. The particular form of the output data depends on the use of the data. For example, output data may be pay-checks for employees.
Computer Data Processing


Computer Fundamentals(Computer - Number System)

Computer - Number System

When we type some letters or words, the computer translates them in numbers as computers can understand only numbers.
A computer can understand positional number system where there are only a few symbols called digits and these symbols represent different values depending on the position they occupy in the number.
A value of each digit in a number can be determined using
  • The digit
  • The position of the digit in the number
  • The base of the number system (where base is defined as the total number of digits available in the number system).

Decimal Number System

The number system that we use in our day-to-day life is the decimal number system. Decimal number system has base 10 as it uses 10 digits from 0 to 9. In decimal number system, the successive positions to the left of the decimal point represent units, tens, hundreds, thousands and so on.
Each position represents a specific power of the base (10). For example, the decimal number 1234 consists of the digit 4 in the units position, 3 in the tens position, 2 in the hundreds position, and 1 in the thousands position, and its value can be written as
(1x1000)+ (2x100)+ (3x10)+ (4xl)
(1x10³)+ (2x10²)+ (3x101)+ (4xl00)
1000 + 200 + 30 + 1
1234
As a computer programmer or an IT professional, you should understand the following number systems which are frequently used in computers.
S.N.Number System & Description
1Binary Number System
Base 2. Digits used: 0, 1
2Octal Number System
Base 8. Digits used: 0 to 7
4Hexa Decimal Number System
Base 16. Digits used: 0 to 9, Letters used: A- F

Binary Number System

Characteristics
  • Uses two digits, 0 and 1.
  • Also called base 2 number system
  • Each position in a binary number represents a 0 power of the base (2). Example 20
  • Last position in a binary number represents a x power of the base (2). Example 2x where x represents the last position - 1.

Example

Binary Number: 101012
Calculating Decimal Equivalent:
StepBinary NumberDecimal Number
Step 1101012((1 x 24) + (0 x 23) + (1 x 22) + (0 x 21) + (1 x 20))10
Step 2101012(16 + 0 + 4 + 0 + 1)10
Step 31010122110
Note: 101012 is normally written as 10101.

Octal Number System

Characteristics
  • Uses eight digits, 0,1,2,3,4,5,6,7.
  • Also called base 8 number system
  • Each position in a octal number represents a 0 power of the base (8). Example 80
  • Last position in a octal number represents a x power of the base (8). Example 8x where x represents the last position - 1.

Example

Octal Number: 125708
Calculating Decimal Equivalent:
StepOctal NumberDecimal Number
Step 1125708((1 x 84) + (2 x 83) + (5 x 82) + (7 x 81) + (0 x 80))10
Step 2125708(4096 + 1024 + 320 + 56 + 0)10
Step 3125708549610
Note: 125708 is normally written as 12570.

Hexadecimal Number System

Characteristics
  • Uses 10 digits and 6 letters, 0,1,2,3,4,5,6,7,8,9,A,B,C,D,E,F.
  • Letters represents numbers starting from 10. A = 10. B = 11, C = 12, D = 13, E = 14, F = 15.
  • Also called base 16 number system
  • Each position in a hexadecimal number represents a 0 power of the base (16). Example 160
  • Last position in a hexadecimal number represents a x power of the base (16). Example 16x where x represents the last position - 1.

Example

Hexadecimal Number: 19FDE16
Calculating Decimal Equivalent:
StepBinary NumberDecimal Number
Step 119FDE16((1 x 164) + (9 x 163) + (F x 162) + (D x 161) + (E x 160))10
Step 219FDE16((1 x 164) + (9 x 163) + (15 x 162) + (13 x 161) + (14 x 160))10
Step 319FDE16(65536+ 36864 + 3840 + 208 + 14)10
Step 419FDE1610646210
Note: 19FDE16 is normally written as 19FDE.


Computer Fundamentals(Computer - Hardware)

Computer - Hardware


Hardware represents the physical and tangible components of the computer i.e. the components that can be seen and touched.
Examples of Hardware are following.
  • Input devices -- keyboard, mouse etc.
  • Output devices -- printer, monitor etc.
  • Secondary storage devices -- Hard disk, CD, DVD etc.
  • Internal components -- CPU, motherboard, RAM etc.
Computer Hardware

Relationship between Hardware and Software

  • Mutually dependent.Both of them must work together to make computer produce a useful output.
  • Software cannot be utilized without supporting hardware.
  • Hardware without set of programs to operate upon cannot be utilized and is useless.
  • To get a particular job done on the computer, relevant software should be loaded into the hardware
  • Hardware is a one time expense.
  • software development is very expensive and is a continuing expense.
  • Different software can be loaded on a hardware to run different jobs.
  • A software acts as an interface between the user and the hardware.
  • If hardware is the 'heart' of a computer system, then software is its 'soul'.Both are complimentary to each other.

Computer Fundamentals(Computer - Software)

Computer - Software

Software is a set of programs, which is designed to perform a well defined function. A program is a sequence of instructions written to solve a particular problem.
There are two types of software
  • System Software
  • Application Software

System Software

The system software is collection of programs designed to operate, control and extend the processing capabilities of the computer itself. System software are generally prepared by computer manufactures.
These softwares comprise of programs written in low level languages which interact with the hardware at a very basic level. System software serves as the interface between hardware and the end users.
Some examples of system software are Operating System, Compilers, Interpreter, Assemblers etc.
System Software Features of System Software are following
  • Close to system.
  • Fast in speed.
  • Difficult to design.
  • Difficult to understand.
  • Less interactive.
  • Smaller in size.
  • Difficult to manipulate.
  • Generally written in low level language.

Application Software

Application software are the software that are designed to satisfy a particular need of a particular environment. All software prepared by us in the computer lab can come under the category of Application software.
Application software may consists of a single program, such as a Microsoft's notepad for writing and editing simple text. It may also consists of a collection of programs, often called a software package, which work together to accomplish a task, such as a spreadsheet package.
Examples of Application software are following
  • Payroll Software
  • Student Record Software
  • Inventory Management Software
  • Income Tax Software
  • Railways Reservation Software
  • Microsoft Office Suite Software
  • Microsoft Word
  • Microsoft Excel
  • Microsoft Powerpoint
System Software Features of Application Software are following
  • It is close to user.
  • It is easy to design.
  • More interactive.
  • Slow in speed.
  • Generally written in high level language.
  • Easy to understand.
  • Easy to manipulate and use.
  • Bigger in size and requires large storage space.


Computers tips

Computers tips

The biggest problem users have with their computers is their little knowledge of how to secure and protect their personal computers and their information. Computer tip number one for every user is to use an anti-virus program. Most use an anti-virus program already installed on their computer but like most some have no anti-virus installed at all.
What most users don’t know is that there are free programs available that work just as great if not better than paid versions. Protecting your computer is the 1st step that should be taken when using your computer. Knowing how to update the anti-virus program is 2nd. Malware, Trojans, spyware and many other types can render your pc or laptop useless, and may even make it vulnerable for hackers to steal bank information, passwords and other private data needed for identity theft.
Computers tips
Computers tips
Some computers tips the users can do themselves to help secure their data are to learn about safe –browsing. By using a program like WOT, you can browse sites knowing it’s a safe site to visit. It gives you a rating and warns you if it’s a potentially harmful site. Another computer tip is to know how to update your browser. Updates are readily available by going to the site of the browser and checking for new updates.
One of the most important of all the computers tips is to use a firewall. Windows has a build in firewall or you can use free programs as an added protection. User should also be wary of downloading files over the internet. Never download from site you don’t know, if you have question about the site use Google to search the site. Educating yourself and having good computer habits will reduce your stress and prolong the life of your computer.
Backing up your computer to an external hardrive will reduce the risk of losing precious date should your computer become infected or your hard drive fails you. These basic steps will help but so will making sure to password protect logons, bank accounts, even your pc. Using a strong password will make it harder for hackers to crack and keep you and your computer safe.

Computer Tips for New Users

In today’s tech savvy, electronic age, almost everyone has a laptop or home computer. We all know how to check e-mail, chat and use Facebook or tweet on twitter. But, the key to keeping your new gadget alive, well secure and clean is a little less known to the everyday user. So, to help keep your life simple, here are a few computer tips that just might save you from having to pay someone to fix the electrical beast or worse yet, pay someone to fix something that you think is broken.
Let’s talk about a few things that you should know, no matter what stage of user you are, from beginner to power user, these computer tips and descriptions should help you learn how to resolve the issues associated with them. First a “Cookie”, is a file that a web page stores on your computer. It allows the web page and therefore the company to remember what you looked at, what you purchased and even keeps track of things like page layout, etc. This can be good, but can also be used negatively by questionable companies. It is stored on your computer and should be cleaned often.
Computer Tips for New Computer Users
 It is up to you to keep your gadget clean. “Malware”, is simply a piece of software usually, accidentally installed by the user that can cause malicious intent, like switching your home page in your web browser or sending your search engine to another default engine. It is sometimes packaged with a piece of software that is downloaded from the internet and is installed without the users knowledge.
Remember this computer tip: It is best to always get software form a reputable source and refrain from clicking or downloading on links that can cause malicious intent. “Spyware”, is a little worse than malware, it can be installed the same way as malware, but can also attack your computer by just visiting a web page or by viewing an infected image. It’s important to watch your step; in as much if you were in a seedy part of town you might not go down an alley or walk alone into a darkly lit store.

Computer Tip : how to clean, speed and improve your PC performance


Computer Tip : how to clean, speed and improve your PC performance  

By using very easy methods, you can improve your computer and increase your PC speed, also keep it running smoothly. You can use various tools available in the all versions of the Windows operating systems like windows vista, windows 7 and windows XP to maintain your PC and make your PC clean, faster and safe. Some of the simple computer tips and guidelines are as follows to make your computer faster and teach you to improve your computer’s performance and efficiency.
First of all install and update a good antivirus to help and protect your computer from spyware, malwares and viruses. This is the one important cause which makes your PC slow and decreases the efficiency of your computer. The most important computer tip is to upgrade the RAM and also includes use of three important tools Check Disk, Disk Defragmenter, and Disk Cleanup. Every Windows operating system facilitates these three important tools to help keep your computer run smoothly. You can run Check Disk and Disk Defragmenter to check, detect, repair and clean disk errors of your computer.
Disk Defragmenter scans the hard drive for bad sectors, errors and helps prevent data loss. And if your hard disk is full or have a very little space on it than do backup of your important documents and run Disk Cleanup to clean unused and unnecessary files. Disk clean up will removes all unnecessary and unused files from your computer. Disk Clean up will help you to remove unused files, unnecessary and unwanted programs, empty the recycle bin, remove error reports and temporary files, and Remove unused restore points. You should also remove your temporary files and cookies from your computer because these temporary files use lots of space and can slow your computer’s speed and performance.
By performing all these simple computer tips and steps monthly you can find it easier to improve your computer speed, performance and efficiency.


Wireless Home Networking

Fix Connectivity Issues

It sounds crazy, but 95 percent of all Internet connectivity problems can be solved by power-cycling both the router and the modem. Turn them both off, and then turn the modem back on first. Once its "sync" or signal light comes on, turn on your router.

Use Encryption

You've probably heard this before, but it bears repeating: Always enable your router's wireless security! Wired Equivalent Privacy (WEP) encryption is the oldest (and weakest) form of security; the newer (and stronger) Wi-Fi Protected Access (WPA) and WPA-2 are the best protection available today for home users.

Update Your Router's Firmware

All routers include internal read-only chips with embedded instructions that can be updated by the manufacturer. Router manufacturers generally update a product's firmware to increase performance as well as to resolve bugs and security issues, so it's wise to keep your router's firmware up-to-date. Check the manufacturer's Web site for the latest updates.

Boost Your Wireless Signal

If walls and distance are causing wireless signal degradation, you can do a few things to boost it. Move your router to higher ground—the signal radiates downward. You can also try a signal extender (or repeater), which boosts the signal. Finally, high-gain antennas will work, but they only focus the signal in one direction.

Change Admin Password

Every router has a well-known default password that's used to access the router's browser-based configuration page. Most setup wizards will make you change this password, but not all do. If not, be sure to change it yourself to prevent unwanted hangers-on from changing your network's settings.

Go Back to Factory Settings

If you've lost or forgotten your router's login credentials, you can get around this predicament by resetting the router to its factory settings. Do this by holding down the button on the back of it for 30 seconds. Next, look in the manual for the default user name and password, and then change them on your router's browser-based configuration page.

Disable SSID Broadcast

Unless you disable it, your router broadcasts its service set identifier (SSID)—the name of your network—which allows your neighbors to see (and attempt to gain access to) your network. Instead, disable broadcasting, making the network appear as "SSID not broadcast." Access the unnamed network by typing in the SSID name when prompted.

Change the Default SSID

Change your pre-defined, default SSID—leaving it as "Linksys," for example, tells the world that you haven't configured your router, which invites attackers.

Filter by MAC Address

Every piece of networking gear includes a unique "fingerprint" called a media access control, or MAC, address. You can configure your router to filter connections using these addresses so that only your computers can connect to your network. Most routers will show you connected devices, so adding an adapter's MAC address is a one-click process.

Step Up to 5GHz

The majority of today's networks operate in the crowded 2.4GHz frequency range, which is shared by microwaves, cordless phones, and other home networks. To avoid possible interference, many new routers are capable of broadcasting at 5GHz, which has 23 wide-open channels as opposed to 2.4GHz's three non-overlapping channels.

Limit Your Number of DHCP Clients

Most people use their router as a DHCP server; when clients connect, the router dynamically assigns IP addresses from a large pool of addresses. Limiting that list to the number of clients in your home, however, will help prevent interlopers from hopping onto your network.

Use Your Router's Firewall

Two features make most hardware firewalls more powerful than software firewalls: stateful packet inspection (SPI) and network address translation (NAT). SPI examines packets' content and behavior before granting access, and NAT hides all PCs connected to the router from the Internet, "translating" their IP addresses into private ones that are unreachable from outside the firewall.

Change Your Channel

Wireless B and G (and some N) routers operate at the 2.4GHz frequency, which only has three non-overlapping channels: 1, 6 and 11. By default, your router will most likely be using one of these channels, and the bad news is so your neighbors' routers as well. If you experience dropped connections, sluggish performance or both, a good first step is to switch the channel. If it's set to channel 1, go to 11. If it's set to 6, try either 1 or 11 for best results.

Let Windows Control Your Wireless Networks

If a network adapter's software takes control of your wireless network, it can be difficult to put Windows back in charge. First, click Start, then Run, then type services.msc. Scroll down to Wireless Zero Configuration and start the service. Right-click your wireless connection, select view available networks, and then click advanced settings on the left. Click the wireless networks tab, and check "Use Windows to Configure my wireless network settings."

Disable File Sharing in Public

If you're in a public place with a Net connection, it's a good idea to disable File and Printer Sharing for Microsoft Networks. In the properties of your network adapter, uncheck the appropriate box. It's also a good idea to switch your notebook's wireless radio off if you aren't using it.

How to set your mouse to click automatically

How to set your mouse to click automatically

Do you want to make your mouse clicks automated?
Do you know, how to do it?
Then this software can fulfill your desire.
This is FREE AUTO MOUSE CLICKER!
With this software, you can set your mouse to click on a certain area of your screen in a fixed time interval.
If you want to refresh any web page frequently, then this tiny software will make your task very easier.
How to set mouse to click automatically
HOW TO USE IT:
1. Just download the software from the download link below.
2. Install it & run it.
3. Set your click time interval, Start hot-key, Stop hot-key and click options.
4. Press the Start hot-key/Start button of the software to enjoy auto clicking!

Automatic mouse click software
The software will make your mouse click where it stays after a fixed time interval.
HOW TO DOWNLOAD THIS SOFTWARE:


How to Play Full screen Games on Laptop Computers

How to Play Full screen Games on Laptop Computers

Most people love to play games on computer. Now a days, wide screen monitors are increasing in number. But some games are not adaptable to those monitors. There is 2 black bars on two sides of those games. It is really embarrassing during playing a game. So, we need something that can fit the game window to the monitor size.
How to play fullscreen games
Are you facing the above problem during playing games on your computer (desktop/laptop) due to your wide screen monitor?
Do you want to remove the black bars on both sides & make it like this:
How to play games in fullscreen
Then here is the solution of this problem.
STEPS:
1. Download this tool.
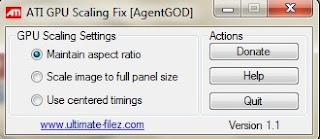
2. Open the software. A window will appear like this…

How to play fullscreen games
3. Select the second option “Scale image to full panel size”.
4. Now open the game you want to play in full screen. You will find that the game is now in full screen.
You don’t have to do this for every time. From now on, every time you play those games, they will appear as full screen, fitted for your screen resolution.

How To Increase Sound Quality Of Your Laptop By 200%

How To Increase Sound Quality Of Your Laptop By 200%

Laptops are vulnerable than desktop. Most laptops don’t have a good sound system. As a laptop is a small device, smaller than desktop, it’s sound quality is less in most cases than desktops. When you need more sound in your laptop as during playing a video or audio file, you may need to increase your laptop’s sound quality to some extent. There are some ways in which you can increase the sound quality of your laptop. In this post, I will show you one of them where you can increase the sound quality by at least 200% of the previous one.
HOW TO INCREASE SOUND QUALITY OF LAPTOP BY 200%:
Follow the procedure step by step to increase your laptop’s sound quality:
1. At first, go to your desktop screen. Right click on the volume icon on the right side of your task bar. See below screenshot.
Increase Sound of your Laptop
2. After you right click on this icon, you will see the options like this:
Increase Laptop's Sound by 200% 
3. Now Click on PLAYBACK DEVICES. You will see a new window like this:
Increase Laptop's sound by 200%
4. Now double click on SPEAKERS. You will see another window like this:
How to increase laptop's sound
5. Now click on ENHANCEMENTS tab. Then you will see the above screenshot. Mark the box beside LOUDNESS EQUALIZATION. Lastly click on APPLY.
Now, check your laptop’s sound quality. I hope, it is increased than before. You will find it helpful when you want to watch movies with friends and need a loud sound quality.


Free ur Ram 4 Boost the System Speed

Free ur Ram 4 Boost the System Speed

Hi friends,
well, if you facing slow speed
problem due to low volume
ram,you dont want to buy new high
volume ram for your system,ok.then
i have a trick to take free some
amount of your ram,it will boost
your system performance.
ok lets comes to the topic
to do so-
>open notepad
>type :FREEMEM=SPACE(640000)
(: its not included)
>Save it as -freeRAM.vbs
>close the notepad
>look at your desktop,now you will
find a script on your desktop.
Double click on it always,when you
want to free some space of your
ram.

HOW TO TURN ON UR PC IN JUST 10 SECONDS ?

HOW TO TURN ON UR PC IN JUST 10 SECONDS ?


Here’s what u have to do to turn ur
pc on in 10 seconds
Click on the start button then press
R it will take u to Run well go to run
n type Regedit
press enter
this will open Registery Editor
now look for the key
HKEY_LOACAL_MECHINE\SYSTEM
\Cur rentControlSet\Contr ol
\ContentIndex
now there find the Key Called
“Startup Delay”
Double Click On It
Now where its Base
Click Decimal
Now its Default Value Is 4800000
(75300:hexadecimal)
Change The Value To 40000
here u go u have done it
now close the Registery Editor and
Restart Your Computer
You’ll See The Result

Login To Your PC Using Face Recognition System like Android

Login To Your PC Using Face Recognition System like Android

Luxand Blink! Pro. is the name of the software (16 MB)
LINK 1]  http://www.filesonic.in/file/676638881/Product_version_2.3.zip
LINK 2] http://depositfiles.com/files/ags3o6tag
LINK 3] http://www.luxand.com/download/LuxandBlinkSetup.exe

Upgrade windows 8 to windows 8.1


how to upgrade windows to windows 8.1 


Are you curious to try the refined version of Microsoft’s controversial Windows 8? Anyone using Windows 8 can nowupgrade to a preview version of Windows 8.1 for free. This update refines Windows 8, giving keyboard and mouse users important interface improvements and making the Modern interface more powerful. Windows 8.1 is what Windows 8 should have been.
Note that you can’t downgrade back to Windows 8 without completely reinstalling your operating system from Windows 8 installation media or arecovery drive. Windows 8.1 is also not a final, stable version, so you may experience bugs and crashes. You shouldn’t install Windows 8.1 on your primary computer — it’s best confined to computers you can afford to experiment with and virtual machines.

How to Upgrade

You can download and install a Windows 8.1 Preview ISO file to upgrade straight to Windows 8.1 if you’re still on Windows 7. However, we’ll assume you want to upgrade an existing Windows 8 system to Windows 8.1.
First, open this web page on the Windows 8 system you want to upgrade. Click the Get the update button and run the small program. This program will make Windows 8.1 available from the Windows Store.
If you’re using an English language version of Windows 8, your system language must be set to US English. You can find a full list of supported languages on the Windows 8 preview page— be sure to set your system to any of the supported languages. If you’re using another regional variant, like UK English, this program won’t install. Windows 8.1 is also not yet available as an update for Windows 8 Enterprise, only the standard and Professional editions of Windows 8.

After you run the updater, you’ll see an “Installation Complete” message that prompts you to restart your computer. Windows 8.1 isn’t actually installed yet. Just click the Restart Now button to restart your computer.

Log into your computer after it boots back up and you’ll see a “Get Windows 8.1 Preview for free” message on your Start screen. Click the Go to the Store button and you’ll be taken to the Windows Store, where you can download the Windows 8.1 update. When the final version of Windows 8.1 is released, all users will likely see a message like this one.

Click or tap the Download button as if you were downloading any Modern app from the Windows Store. Windows will download and install the Windows 8.1 update. It’s several gigabytes in size, so you’ll have to wait a while. After the download process is complete, Windows will install the Windows 8.1 update and reboot your system. The rest of the setup process will happen automatically.
Sign into Windows after the update process is complete and you’ll see a few screens asking you for settings, including a new screen that asks you whether you want to enable Windows 8.1′s new deep SkyDrive integration. SkyDrive isn’t separate from Windows 8′s sync features anymore — it’s integrated.
windows-8.1-skydrive-splash

What To Expect From Windows 8.1

Whether you’re upgrading now or waiting until the final version of Windows 8.1, there are big changes awaiting you. Microsoft has made many changes, from tweaks to the way the desktop works and a more comprehensive PC Settings app to changes to the Modern interface and a collection of updates to the many included Modern apps. We can’t possibly cover them all, but we’ll hit on some of the big ones.

Desktop Improvements

Windows 8 restores a Start button to the desktop, allows you to boot to the desktop, and allows you to disable the upper hot corners for the app switcher and charms bar. The new Start button just opens the Start screen, but you can set the Start screen to use your desktop background, making it less jarring. You can also set the All Apps view to automatically open at the Start screen and place your desktop apps first in the list, so you never even have to see the live tiles. The right-click power user menu now has Shut Down and Restart options, while universal search of your apps, settings, and files is now restored. If you really want a traditional Start menu, Start8 still works with Windows 8.1.
windows-8.1-navigation-options

Modern UI Improvements

The Snap feature is now much more useful, so you can snap two apps in 50/50 view and have them each take up half your screen. You can also Snap up to four apps at once on larger displays. The search interface has been revamped and now offers detailed Bing search results. Many of the included Modern apps have been updated and redesigned.

SkyDrive Integration

SkyDrive is more integrated into Windows 8, both in the PC Settings app where it’s now a Sync option and in the desktop, where it’s available in File Explorer. SkyDrive no longer syncs all your files to your PC, but gives you access to them and allows you to make certain files available offline — perfect for devices with small amounts of local storage assuming you have a lot of files in the SkyDrive cloud.

Internet Explorer 11

Internet Explorer 11 is a big improvement, particularly in the Modern interface, where it can now open more than 10 tabs at once. IE 11 also offers tab sync across Windows 8.1 and Windows Phone. Websites pinned to your Start screen can function as live tiles. Under the hood, Internet Explorer 11 now offers support for WebGL and SPDY, allowing websites to use 3D graphics and faster connections. You can now open multiple copies of a Modern app, which is particularly useful for IE — you can have two web pages side-by-side in Modern IE, for example.

App Updates

The Windows Store and Xbox Music have seen the biggest updates and now have interfaces that are much better thought out than the half-baked ones introduced with Windows 8. Microsoft has also added Alarms, Calculator, Sound Recorder, Health & Fitness, and Food & Drink apps. The Messaging app will be replaced by Skype. There’s also a Help app included to help new users get to grips with Windows 8, although it isn’t working yet.

Windows 8 also includes native support for 3D printers and Intel’s Miracast wireless display streaming — think of it like an open standard to rival Apple’s AirPlay. More feature will likely be rolled out soon, particularly to Microsoft’s Modern apps.
The final version of Windows 8.1 is scheduled for release in late 2013, but Microsoft hasn’t announced a concrete date yet.
Have you upgraded to Windows 8.1 yet? If you didn’t like Windows 8, are these changes enough to make you want to upgrade? Leave a comment and share your thoughts .

Thank you . Have a nice day .
keep in touch with Tech Electro .

Install Windows 7 From USB


How To Install Windows 7 From USB

A Tutorial on Using a USB Flash Drive To Install Windows 7


Chances are you'll need to install Windows 7 from a USB device if you have a tablet, or small laptop or netbook device, few of which include optical drives as standard hardware.
This means that you must get the Windows 7 setup files onto a flash drive (or any USB based storage) and then boot from that flash drive to get the Windows 7 installation process started.
However, simply copying the files from your Windows 7 DVD to a flash drive won't work. You have to specially prepare the USB device and then properly copy the Windows 7 install files to it before it'll work as you expect.
You're in a similar, but slightly easier to solve, situation if you've purchased a Windows 7 ISO file directly from Microsoft and need that on a flash drive.
No matter what situation you're in, just follow the instructions below to install Windows 7 from a USB device.
Note: The following tutorial applies equally to whatever edition of Windows 7 you have a disc or ISO image of: Windows 7 Ultimate, Professional, Home Premium, etc.
Difficulty: Average
Time Required: Correctly preparing a USB drive for use as an installation source for Windows 7 will take around 15 to 30 minutes depending on your computer speed and what edition of Windows 7 you have on DVD or in ISO format
Requirements:
  • A Windows 7 ISO [Download Windows 7] or a Windows 7 DVD [Check Prices]
  • A 4 GB (or larger) flash drive [Check Prices]
  • Access to a computer with Windows 7, 8, Vista, or XP installed and working properly, as well as with a DVD drive if you have a Windows 7 DVD
Important: Start with Step 1 below if you have a Windows 7 DVD or Step 2 if you have a Windows 7 ISO image.

Here's How:

  1. Create an ISO file from the Windows 7 DVD. If you already know how to create ISO images, fantastic: do it, and then come back here for further instructions on what to do with it.

    If you've never created an ISO file from a disc before, check out the tutorial linked above. It'll walk you through installing some free software and then using it to create the ISO. An ISO image is a single file that perfectly represents a disc... in this case, your Windows 7 installation DVD.

    Next we're going to work on properly getting that Windows 7 ISO image you just created onto the flash drive.
  2. Download the Windows 7 USB/DVD Download Tool from Microsoft. Once downloaded, execute the file and follow the installation wizard.

    This free program from Microsoft, which works in Windows 8, Windows 7, Windows Vista, or Windows XP, will correctly format the USB drive and then copy the contents of your Windows 7 ISO file to the drive.
  3. Start the Windows 7 USB DVD Download Tool program, which is probably located in your Start menu or on your Start screen, as well as on your Desktop.
  4. On the Step 1 of 4: Choose ISO file screen, click Browse.
  5. Locate, and then select, your Windows 7 ISO file. Then click Open.

    Note: If you downloaded Windows 7 directly from Microsoft, check for the ISO image wherever you tend to store downloaded files. If you manually created an ISO file from your Windows 7 DVD in Step 1 above then it will be wherever you created it to.
  6. Click Open.
  7. Click Next once you're back on the Step 1 of 4 screen.
  8. Click USB device on the Step 2 of 4: Choose media type screen.
  9. On the Step 3 of 4: Insert USB device screen, choose the flash drive or external hard drive you want to put the Windows 7 installation files on.

    Tip: If you haven't yet plugged in the flash drive or other device you're using then you can do that now. Just click the blue refresh button to make it show up in the list.
  10. Click the Begin copying button.
  11. Click Erase USB Device if you're prompted to do so on a Not Enough Free Space window. Then click Yes to the confirmation in the next window.

    Note: If you don't see this it just means that the flash drive or external hard disk you've selected is already empty.

    Important: Any data you have on this USB drive will be erased as part of this process.
  12. On Step 4 of 4: Creating bootable USB device, wait for the Windows 7 USB DVD Download Tool to format the USB drive and then copy the Windows 7 installation files to it from the ISO image you provided.

    You'll see a Status of Formatting for several seconds, followed by Copying files. This part might take as long as 30 minutes, maybe even longer, depending on which edition of Windows 7 the ISO file you have is from, as well as on how fast your computer, USB drive, and USB connection is.

    Tip: The percentage complete indicator may sit on one or more percentages for a long time. This does not mean anything is wrong.
  13. The next screen you see should say Bootable USB device created successfully.

    You can now close the Windows 7 USB DVD Download Tool program. The USB drive can now be used to install Windows 7.
  14. Boot from the USB device to start the Windows 7 setup process.

    Tip: You may need to make changes to the boot order in BIOS if the Windows 7 setup process doesn't start when you try to boot from the USB drive. See How To Change the Boot Order in BIOS if you've never done that.

    Tip: If you still can't get the flash drive to boot, and you also have a UEFI based computer, see Tip #1 below for help.

    Note: If you arrived here from How To Clean Install Windows 7, you can now return to that tutorial and continue installing Windows 7. See How To Install Windows 7 if you weren't doing a clean install or you're not sure what kind of installation to do.

Tips:

  1. When the Windows 7 USB DVD Download Tool formats the flash drive during the process above, it does so using NTFS, a file system that some UEFI systems won't boot from if on a USB stick.

    To get the USB drive to boot on these computers, you should copy the data from the flash drive onto a folder on your computer, then reformat the flash drive using the older FAT32 file system, and then copy that same data back onto the drive.
Take deep breathe .Have a nice day .
Thank you .
Copyright © 2015 TechElectro - Blog
| Distributed By Mishu