Turn your Mac into a WiFi hotspot using OS X’s internet sharing

Have
you ever been in a situation where you had multiple devices that needed
to connect to the internet, but only one available source (like an
ethernet cable or cellular air card)? Sharing your internet connection
is only a few clicks away.
Although free WiFi access points are spreading like wildfire, let’s
say you’re on vacation and the hotel you’re staying at only offers
internet via a single ethernet port in the wall. It may not be a big
deal if you’re traveling alone with one laptop, but you’re most likely
staying with friends or family that have their own technology addictions
to feed. So what are you going to do about this little situation where
there are a mix of PCs, Macs, and iPhones clamoring for contact with the
outside world? Patiently take turns? Ha! Good luck relaxing on that
vacation.The answer is in the Sharing pane of System Preferences on your Mac. Mac OS X actually lets you turn your computer into a mock wireless router for others to pick up the signal and connect to the internet. It’s an easy and secure way to get a variety of devices online when WiFi isn’t available. Here’s how to do it:
1. Open System Preferences and go to the Sharing pane under the Internet & Network heading.
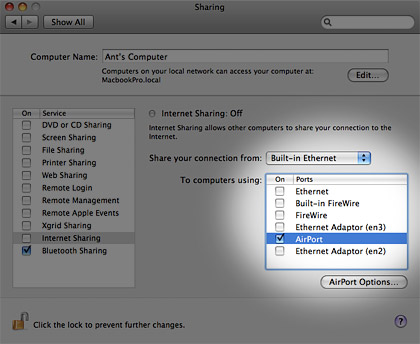
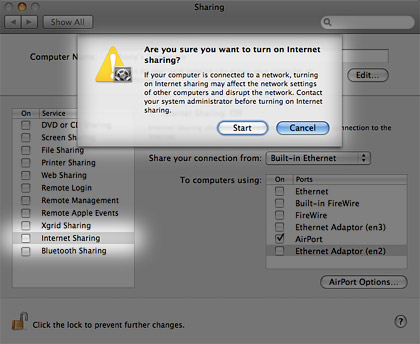
2. On the list of services to the left, select Internet Sharing. Don’t check it quite yet — there’s a few options that need to be set first.
3. Depending on what your current internet source is, select it from the menu next to “Share your connection from.” As you can see below, I chose Built-in Ethernet since that is how my Mac is getting online at the moment.

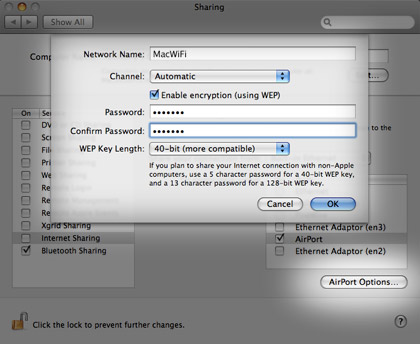
5. While it is not required, it’s generally a good idea to lock down the WiFi hotspot you’re creating with a password just in case unwanted visitors are tempted to steal your bandwidth. Click on the AirPort Options button to configure these security settings.
6. In the window that pops up, type a basic Network Name and check the “Enable encryption (using WEP)” box. Enter an easy to remember (but not easy to guess) password in the boxes below. Remember you will have to provide this password to anyone you want to have access to your Mac’s shared wireless network. Click OK.


