Taking screenshots in Mac OS X: A collection of tips & tricks
It’s
mind-boggling how many different ways we can take screenshots – also
known as screen grabs – using just the tools already bundled with Mac OS
X. Who knew such a simple task could be so customizable?
Screenshots are great for capturing important images, showing others
how to do certain tasks with visual aids, or documenting weird
computer-related glitches. What’s even better is how many options Mac
users have at their disposal for quickly and easily grabbing these
images in an instant. In this tutorial we’re going to tackle the main
methods of taking screenshots in Mac OS X using a variety of keyboard
shortcuts, Terminal, and Grab.Basic keyboard shortcuts
The most common ways to take a quick screenshot on a Mac include using a combination of keystrokes which vary depending on what you want to capture. These are the three which come in most handy:- Command+Shift+3: Captures the entire screen all at once.
- Command+Shift+4: Turns the arrow cursor to crosshairs, letting you click and drag to select a specific area on the screen.
- Command+Shift+4, then Space: Hovering over any window, Desktop icon, or Dashboard widget will automatically highlight it. Clicking on it will capture just that object.
Advanced keyboard shortcuts
While using the Command+Shift+4 crosshairs method, there are a number of ways to manipulate the selection. For example, once dragging has started, holding the spacebar while moving the mouse will also reposition the entire selection box while still maintaining its dimensions. Holding the Option key down instead will resize the selection with the center as the point of origin. This makes all adjustments of the selection symmetrical instead of just on the bottom-right corner. Finally, pressing and holding the Shift key down will resize the selection in only one direction while the other direction stays fixed (up/down or left/right). Note that some or all of these may be 10.5 Leopard-only.Changing the default screenshot format
Starting with Mac OS X 10.4 and newer, the default image type for screenshots is PNG. This is the best choice in my opinion (and, apparently, Apple’s too), but there is a way to change it if you choose. Launch Terminal (Applications > Utilities) and enter the following command:defaults write com.apple.screencapture type formatThe “format” part at the end of the first line must be replaced with either png, jpg, tiff, bmp, or pdf depending on your file type preference. Other less common image formats may work as well, but these are the most widely used.
killall SystemUIServer
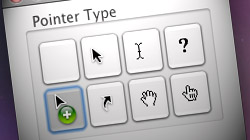
Timed screenshots and capturing the cursor in Grab
If the whole keyboard shortcut thing doesn’t appeal to you, there is another way to take screenshots in Mac OS X. The program is called Grab and it’s located in the Applications > Utilities folder. By going to the Capture menu in Grab, you will find the same functions accomplished with the shortcuts – Selection, Window, and Screen. There’s also one more – Timed Screen. This convenient feature enables users to initiate a screenshot, wait a few seconds to set it up the way they want, and then capture the image automatically with no additional user input.The other advantage of using Grab for screenshots is that the mouse cursor can also be captured. Go to the Grab Preferences menu and you will find a variety of pointer types to match any situation. Select the pointer of your choice and start snapping screenshots – the cursor will be right there, just as you’d expect.
